jotting
正是H5的这么一项技术再加上adobe的svg使得童年的flash逐渐退出了历史的舞台,就像我们不能一直玩洛克王国,玩4399的各种小游戏一样,我们也不可能一直使用旧的技术,web前端再以一种很快的速度更新迭代,技术一直在发展,日新月异。从vue2到vue3,从react的类式组件到函数式组件,从初识css in js的激动不已到css in js的emotion库的主要贡献者提出因为性能的缺陷弃用css in js而采用Sass Modules等等等 ,我初识前端就感受到了它的发展之快,不断的迭代。
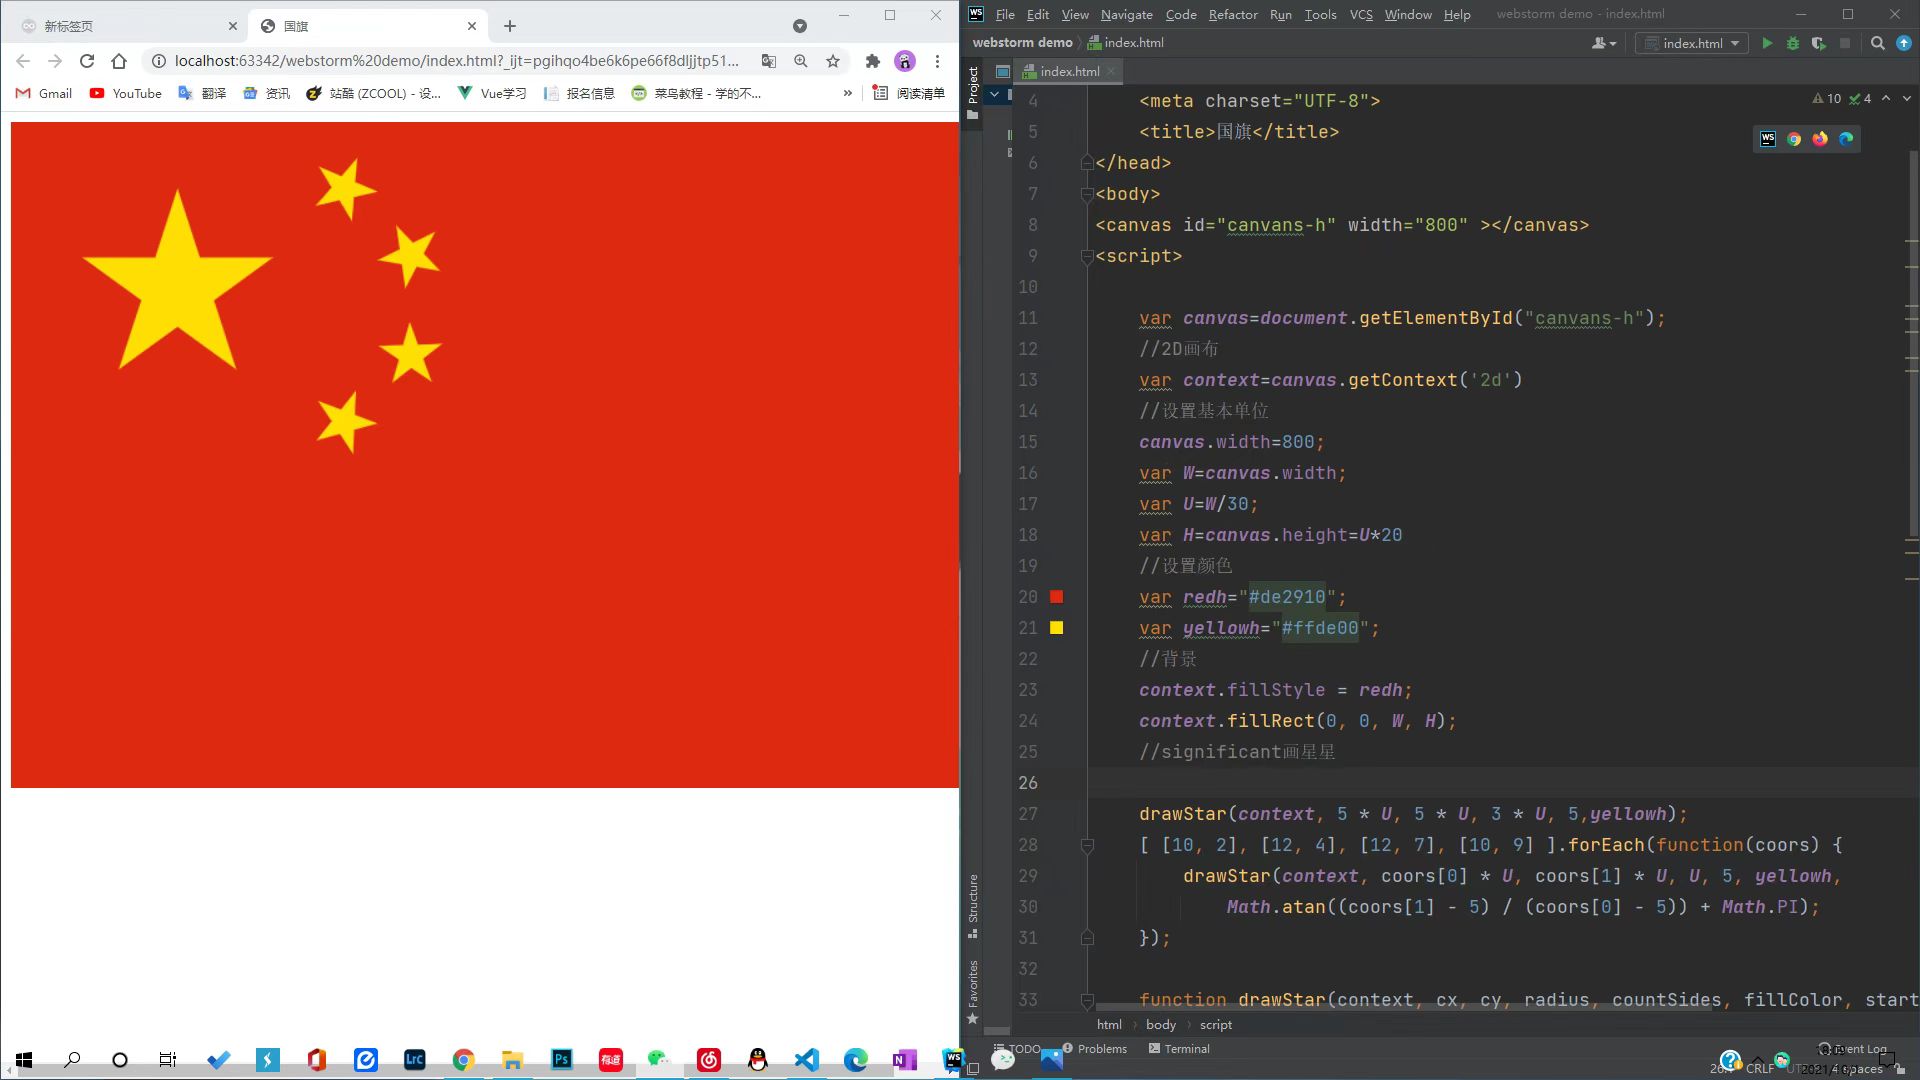
从21年初次学习使用canvas到现在也过去了一年多的时间了,我很喜欢canvas但是我在实际的各个项目中使用的少之又少,在写数据可视化相关的项目时,我也没有去自己使用canvas去写各种效果,因为会占用很多时间,并没有大把的数据可视化的库来的方便,导致很多canvas的特性也早就忘的差不多了,webgl我很感兴趣,three.js我认为拿这些3D的东西写出的页面很炫酷,需要很牢靠的数学支撑,我也在各种的说国内webgl岗位并不多、少等等等中,并未深入学习。这是一篇我复习canvas的一些特性的简单文章。

21年使用canvas画的国旗
go over canvas
canvas标签创建了一个固定大小的画布,公开了一个或多个渲染的上下文,我们想要绘制就要先找到上下文
canvas提供了一个方法—getContext()通过此方法我们就可以获取渲染上下文和绘画功能
上下文类型(contextType)
是一个指示使用何种上下文的 DOMString 。可能的值是:
"2d", 建立一个CanvasRenderingContext2D二维渲染上下文。"webgl"(或"experimental-webgl") 这将创建一个WebGLRenderingContext三维渲染上下文对象。只在实现WebGL 版本 1(OpenGL ES 2.0) 的浏览器上可用。- "
webgl2" (或 "experimental-webgl2") 这将创建一个WebGL2RenderingContext三维渲染上下文对象。只在实现 WebGL 版本 2 (OpenGL ES 3.0) 的浏览器上可用。实验性 "bitmaprenderer"这将创建一个只提供将 canvas 内容替换为指定ImageBitmap功能的ImageBitmapRenderingContext。
线
moveTo(x, y)
设置初始位置,参数为初始位置x和y的坐标点
lineTo(x, y)
绘制一条从初始位置到指定位置的直线,参数为指定位置x和y的坐标点
stroke()
通过线条来绘制图形轮廓
//简单画三角形
<style>
        canvas {
            box-shadow: 0px 0px 5px #ccc;
            border-radius: 8px;
        }
    </style>
</head>
<body>
    <canvas id="canvas" width="500" height="500"></canvas>
    <script>
        var canvas = document.getElementById('canvas')
        if(canvas.getContext) {
            var ctx = canvas.getContext('2d')
            ctx.beginPath()
            ctx.moveTo(50,50)
            ctx.lineTo(200,200)
            ctx.lineTo(200,50)
            ctx.lineTo(50,50)
            ctx.fill()
            ctx.stroke()
        }
    </script>
矩形
x和y 是矩形的起点坐标,width和height 是矩形的宽高。
绘制一个填充的矩形
strokeRect(x, y, width, height)
绘制一个矩形的边框
clearRect(x, y, width, height)
清除指定矩形区域,让清除部分完全透明。
圆和圆弧
绘制圆弧或者圆,我们使用arc()方法。当然可以使用arcTo(),不过这个的实现并不是那么的可靠,所以我们这里不作介绍。
arc(x, y, radius, startAngle, endAngle, anticlockwise)画一个以(x,y)为圆心的以 radius 为半径的圆弧(圆),从 startAngle 开始到 endAngle 结束,按照 anticlockwise 给定的方向(默认为顺时针)来生成。
根据给定的控制点和半径画一段圆弧,再以直线连接两个控制点。
这里详细介绍一下 arc 方法,该方法有六个参数:x,y为绘制圆弧所在圆上的圆心坐标。radius为半径。startAngle以及endAngle参数用弧度定义了开始以及结束的弧度。这些都是以 x 轴为基准。参数anticlockwise为一个布尔值。为 true 时,是逆时针方向,否则顺时针方向。
👻备注: arc() 函数中表示角的单位是弧度,不是角度。角度与弧度的 js 表达式:
弧度=(Math.PI/180)*角度。
二次贝塞尔曲线及三次贝塞尔曲线
二次及三次贝塞尔曲线都十分有用,一般用来绘制复杂有规律的图形(贝塞尔曲线)。
quadraticCurveTo(cp1x, cp1y, x, y)
quadraticCurveTo(cp1x, cp1y, x, y)
绘制二次贝塞尔曲线,cp1x,cp1y 为一个控制点,x,y 为结束点。
bezierCurveTo(cp1x, cp1y, cp2x, cp2y, x, y)
bezierCurveTo(cp1x, cp1y, cp2x, cp2y, x, y)
绘制三次贝塞尔曲线,cp1x,cp1y为控制点一,cp2x,cp2y为控制点二,x,y为结束点。 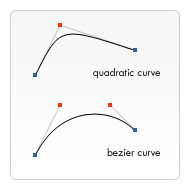
右边的图能够很好的描述两者的关系,二次贝塞尔曲线有一个开始点(蓝色)、一个结束点(蓝色)以及一个控制点(红色),而三次贝塞尔曲线有两个控制点。
参数 x、y 在这两个方法中都是结束点坐标。cp1x,cp1y为坐标中的第一个控制点,cp2x,cp2y为坐标中的第二个控制点。
使用二次以及三次贝塞尔曲线是有一定的难度的,因为不同于像 Adobe Illustrators 这样的矢量软件,我们所绘制的曲线没有给我们提供直接的视觉反馈。这让绘制复杂的图形变得十分困难。在下面的例子中,我们会绘制一些简单有规律的图形,如果你有时间以及更多的耐心,很多复杂的图形你也可以绘制出来。
这里也可以借助一个网页版的三次贝塞尔曲线调试工具来看效果
椭圆
添加椭圆路径。
语法:ellipse(x, y, radiusX, radiusY, rotation, startAngle, endAngle, anticlockwise)
- x、y:椭圆的圆心位置
- radiusX、radiusY:x轴和y轴的半径
- rotation:椭圆的旋转角度,以弧度表示
- startAngle:开始绘制点
- endAngle:结束绘制点
- anticlockwise:绘制的方向(默认顺时针),可选参数。
矩形
直接在画布上绘制矩形的三个额外方法,正如我们开始所见的-绘制矩形,同样,也有 rect() 方法,将一个矩形路径增加到当前路径上。
rect(x, y, width, height)绘制一个左上角坐标为(x,y),宽高为 width 以及 height 的矩形。
当该方法执行的时候,moveTo() 方法自动设置坐标参数(0,0)。也就是说,当前笔触自动重置回默认坐标。
绘制样式
线条的样式
线条的样式可以通过下面一系列属性来设置。
lineWidth
lineWidth 设置当前绘线的粗细。属性值必须为正数。默认值是 1.0。
lineCap
lineCap 设置线段端点显示的样子。可选值为:butt,round 和 square。默认是 butt。
lineJoin
lineJoin 该属性可以设置两线段连接处所显示的样子。可选值为:round, bevel 和 miter。默认是 miter。
miterLimit
miterLimit 限制当两条线相交时交接处最大长度;所谓交接处长度(斜接长度)是指线条交接处内角顶点到外角顶点的长度。
线段之间夹角比较大时,交点不会太远,但随着夹角变小,交点距离会呈指数级增大。
如果交点距离大于miterLimit值,连接效果会变成了 lineJoin = bevel 的效果。
setLineDash/getLineDash
setLineDash 可以设置当前虚线样式。
getLineDash 则是返回当前虚线设置的样式,长度为非负偶数的数组。
lineDashOffset
lineDashOffset 设置虚线样式的起始偏移量。
透明度
除了绘制实色的图形,还可以绘制有透明度的图形。通过设置 globalAlpha 属性或者使用有透明度的样式作为轮廓或填充都可以实现
等等各种样式[可见MDN文档](使用样式和颜色 - Web API 接口参考 | MDN (mozilla.org))
绘制文本
canvas 提供了两种方法来渲染文本:
fillText(text, x, y [, maxWidth\])在指定的 (x,y) 位置填充指定的文本,绘制的最大宽度是可选的。
strokeText(text, x, y [, maxWidth\])在指定的 (x,y) 位置绘制文本边框,绘制的最大宽度是可选的。
同样文本的样式也可以改变
动画
绘制小球
<!DOCTYPE html>
<html lang="en">
<head>
  <meta charset="UTF-8">
  <meta http-equiv="X-UA-Compatible" content="IE=edge">
  <meta name="viewport" content="width=device-width, initial-scale=1.0">
  <title>canvas - 动画</title>
  <style>
    /* 给画布增加一个阴影和圆角的样式 */
    canvas {
      box-shadow: 0px 0px 5px #ccc;
      border-radius: 8px;
    }
  </style>
</head>
<body>
  <canvas id="canvas" width="500" height="500">
    当前浏览器不支持canvas元素,请升级或更换浏览器!
  </canvas>
  <script>
    // 获取 canvas 元素
    var canvas = document.getElementById('canvas');
    // 通过判断getContext方法是否存在来判断浏览器的支持性
    if(canvas.getContext) {
      // 获取绘图上下文
      var ctx = canvas.getContext('2d');
      var ball = {
        x: 100,
        y: 100,
        radius: 25,
        color: 'blue',
        draw: function() {
          ctx.beginPath();
          ctx.arc(this.x, this.y, this.radius, 0, Math.PI * 2, true);
          ctx.closePath();
          ctx.fillStyle = this.color;
          ctx.fill();
        }
      };
      ball.draw();
    }
  </script>
</body>
</html>
速率
我们通过给小球添加速率矢量进行移动。这个依旧用requestAnimationFrame() 方法来实现,在每一帧里面,依旧用clear 清理掉之前帧里旧的圆形。
<!DOCTYPE html>
<html lang="en">
<head>
  <meta charset="UTF-8">
  <meta http-equiv="X-UA-Compatible" content="IE=edge">
  <meta name="viewport" content="width=device-width, initial-scale=1.0">
  <title>canvas - 裁剪</title>
  <style>
    /* 给画布增加一个阴影和圆角的样式 */
    canvas {
      box-shadow: 0px 0px 5px #ccc;
      border-radius: 8px;
    }
  </style>
</head>
<body>
  <canvas id="canvas" width="500" height="500">
    当前浏览器不支持canvas元素,请升级或更换浏览器!
  </canvas>
  <script>
    // 获取 canvas 元素
    var canvas = document.getElementById('canvas');
    // 通过判断getContext方法是否存在来判断浏览器的支持性
    if(canvas.getContext) {
      // 获取绘图上下文
      var ctx = canvas.getContext('2d');
      var ball = {
        x: 100,
        y: 100,
        vx: 1,
        vy: 3,
        radius: 25,
        color: 'blue',
        draw: function() {
          ctx.beginPath();
          ctx.arc(this.x, this.y, this.radius, 0, Math.PI * 2, true);
          ctx.closePath();
          ctx.fillStyle = this.color;
          ctx.fill();
        }
      };
      function draw() {
        ctx.clearRect(0, 0, canvas.width, canvas.height);
        ball.draw();
        // 添加速率
        ball.x += ball.vx;
        ball.y += ball.vy;
       window.requestAnimationFrame(draw);
      }
      window.requestAnimationFrame(draw);
      ball.draw();
    }
  </script>
</body>
</html>
边界
想让小球反弹那么我们就需要添加边界
<!DOCTYPE html>
<html lang="en">
<head>
  <meta charset="UTF-8">
  <meta http-equiv="X-UA-Compatible" content="IE=edge">
  <meta name="viewport" content="width=device-width, initial-scale=1.0">
  <title>canvas - 裁剪</title>
  <style>
    /* 给画布增加一个阴影和圆角的样式 */
    canvas {
      box-shadow: 0px 0px 5px #ccc;
      border-radius: 8px;
    }
  </style>
</head>
<body>
  <canvas id="canvas" width="500" height="500">
    当前浏览器不支持canvas元素,请升级或更换浏览器!
  </canvas>
  <script>
    // 获取 canvas 元素
    var canvas = document.getElementById('canvas');
    // 通过判断getContext方法是否存在来判断浏览器的支持性
    if(canvas.getContext) {
      // 获取绘图上下文
      var ctx = canvas.getContext('2d');
      var ball = {
        x: 100,
        y: 100,
        vx: 1,
        vy: 3,
        radius: 25,
        color: 'blue',
        draw: function() {
          ctx.beginPath();
          ctx.arc(this.x, this.y, this.radius, 0, Math.PI * 2, true);
          ctx.closePath();
          ctx.fillStyle = this.color;
          ctx.fill();
        }
      };
      function draw() {
        ctx.clearRect(0,0, canvas.width, canvas.height);
        ball.draw();
        // 添加速率
        ball.x += ball.vx;
        ball.y += ball.vy;
        // 添加边界
        if (ball.y + ball.vy > canvas.height || ball.y + ball.vy < 0) {
          ball.vy = -ball.vy;
        }
        if (ball.x + ball.vx > canvas.width || ball.x + ball.vx < 0) {
          ball.vx = -ball.vx;
        }
       window.requestAnimationFrame(draw);
      }
      window.requestAnimationFrame(draw);
      ball.draw();
    }
  </script>
</body>
</html>
加速度
为了让动作更真实,我们还需要加入加速度的处理。
<!DOCTYPE html>
<html lang="en">
<head>
  <meta charset="UTF-8">
  <meta http-equiv="X-UA-Compatible" content="IE=edge">
  <meta name="viewport" content="width=device-width, initial-scale=1.0">
  <title>canvas - 裁剪</title>
  <style>
    /* 给画布增加一个阴影和圆角的样式 */
    canvas {
      box-shadow: 0px 0px 5px #ccc;
      border-radius: 8px;
    }
  </style>
</head>
<body>
  <canvas id="canvas" width="500" height="500">
    当前浏览器不支持canvas元素,请升级或更换浏览器!
  </canvas>
  <script>
    // 获取 canvas 元素
    var canvas = document.getElementById('canvas');
    // 通过判断getContext方法是否存在来判断浏览器的支持性
    if(canvas.getContext) {
      // 获取绘图上下文
      var ctx = canvas.getContext('2d');
      var ball = {
        x: 100,
        y: 100,
        vx: 1,
        vy: 3,
        radius: 25,
        color: 'blue',
        draw: function() {
          ctx.beginPath();
          ctx.arc(this.x, this.y, this.radius, 0, Math.PI * 2, true);
          ctx.closePath();
          ctx.fillStyle = this.color;
          ctx.fill();
        }
      };
      function draw() {
        ctx.clearRect(0,0, canvas.width, canvas.height);
        ball.draw();
        // 添加加速度
        ball.vy *= .99;
        ball.vy += .25;
        // 添加速率
        ball.x += ball.vx;
        ball.y += ball.vy;
        // 添加边界
        if (ball.y + ball.vy > canvas.height || ball.y + ball.vy < 0) {
          ball.vy = -ball.vy;
        }
        if (ball.x + ball.vx > canvas.width || ball.x + ball.vx < 0) {
          ball.vx = -ball.vx;
        }
       window.requestAnimationFrame(draw);
      }
      window.requestAnimationFrame(draw);
      ball.draw();
    }
  </script>
</body>
</html>
拖尾效果
加一个拖尾效果:
<!DOCTYPE html>
<html lang="en">
<head>
  <meta charset="UTF-8">
  <meta http-equiv="X-UA-Compatible" content="IE=edge">
  <meta name="viewport" content="width=device-width, initial-scale=1.0">
  <title>canvas - 裁剪</title>
  <style>
    /* 给画布增加一个阴影和圆角的样式 */
    canvas {
      box-shadow: 0px 0px 5px #ccc;
      border-radius: 8px;
    }
  </style>
</head>
<body>
  <canvas id="canvas" width="500" height="500">
    当前浏览器不支持canvas元素,请升级或更换浏览器!
  </canvas>
  <script>
    // 获取 canvas 元素
    var canvas = document.getElementById('canvas');
    // 通过判断getContext方法是否存在来判断浏览器的支持性
    if(canvas.getContext) {
      // 获取绘图上下文
      var ctx = canvas.getContext('2d');
      var ball = {
        x: 100,
        y: 100,
        vx: 1,
        vy: 3,
        radius: 25,
        color: 'blue',
        draw: function() {
          ctx.beginPath();
          ctx.arc(this.x, this.y, this.radius, 0, Math.PI * 2, true);
          ctx.closePath();
          ctx.fillStyle = this.color;
          ctx.fill();
        }
      };
      function draw() {
        // ctx.clearRect(0, 0, canvas.width, canvas.height);
        // 用带透明度的矩形代替清空
        ctx.fillStyle = 'rgba(255, 255, 255, 0.3)';
        ctx.fillRect(0, 0, canvas.width, canvas.height);
        ball.draw();
        // 添加加速度
        ball.vy *= .995;
        ball.vy += .15;
        // 添加速率
        ball.x += ball.vx;
        ball.y += ball.vy;
        // 添加边界
        if (ball.y + ball.vy > canvas.height || ball.y + ball.vy < 0) {
          ball.vy = -ball.vy;
        }
        if (ball.x + ball.vx > canvas.width || ball.x + ball.vx < 0) {
          ball.vx = -ball.vx;
        }
       window.requestAnimationFrame(draw);
      }
      window.requestAnimationFrame(draw);
      ball.draw();
    }
  </script>
</body>
</html>
在taro中使用canvas
最近在写taro的项目时用到了canvas在其中画一个添加的样式,在taro中使用总体上与微信小程序一致。很简单的画了两条线。
import { View, Canvas } from "@tarojs/components";
import Taro from "@tarojs/taro";
import { useEffect, useState } from "react";
import styles from "./index.module.css";

const HFloatingButton = () => {
  const [outStartCoordinate, setOutStartCoordinate] = useState([0, 0]); // 移动前的位置
  const [outMoveCoordinate, setOutMoveCoordinate] = useState([330, 570]); // 移动后的位置
  const [constraintSize, setConstraintSize] = useState<Array<number>>([]); // 可视区的范围

  // 获取可视区的范围
  useEffect(() => {
    const res = Taro.getSystemInfoSync();
    setConstraintSize([res.windowWidth, res.windowHeight]);

    const ctx = Taro.createCanvasContext("myCanvas"); //此处开始绘画
    ctx.moveTo(7, 22.5);
    ctx.lineTo(37, 22.5);
    ctx.setLineWidth(2.5);
    ctx.moveTo(22.5, 7);
    ctx.lineTo(22.5, 37);
    ctx.setStrokeStyle("white");
    ctx.stroke();
    ctx.draw();
  }, []);

  // 判断是否超出边界
  const compareIsBeyond = (x: number, y: number) => {
    if (x >= constraintSize[0] - 45) {
      x = constraintSize[0] - 45;
    } else if (x < 45) {
      x = 0;
    } else {
      x -= 22.5;
    }

    if (y >= constraintSize[1] - 45) {
      y = constraintSize[0] - 45;
    } else if (y < 45) {
      y = 0;
    } else {
      y -= 22.5;
    }
    return [x, y];
  };

  return (
    <View
      className={styles["out-circle"]}
      style={{
        width: "45px",
        height: "45px",
        left: `${outMoveCoordinate[0]}px`,
        top: `${outMoveCoordinate[1]}px`
      }}
      onTouchStart={e => {
        const { clientX, clientY } = e.changedTouches[0];
        setOutStartCoordinate([clientX, clientY]);
      }}
      onTouchMove={e => {
        e.stopPropagation();
        let { clientX, clientY } = e.changedTouches[0];
        let res = compareIsBeyond(clientX, clientY);
        setOutMoveCoordinate(res);
      }}
    >
      <>
        {" "}
        <Canvas
          canvasId="myCanvas"
          id="myCanvas"
          style={{ width: "45px", height: "45px" }}
        ></Canvas>
      </>
    </View>
  );
};
.out-circle {
    border-radius: 50%;
    background-color: #5956E9;
    position: fixed;
}
.out-circle {
    border-radius: 50%;
    background-color: #5956E9;
    position: fixed;
}